Hokkaido Campervan Stargazing Photography Guide | Milky Way, Dark-Sky Spots & Night Photography Tips for Van Life [2026]
A guide to stargazing photography based from a campervan in Hokkaido's low-light-pollution skies.
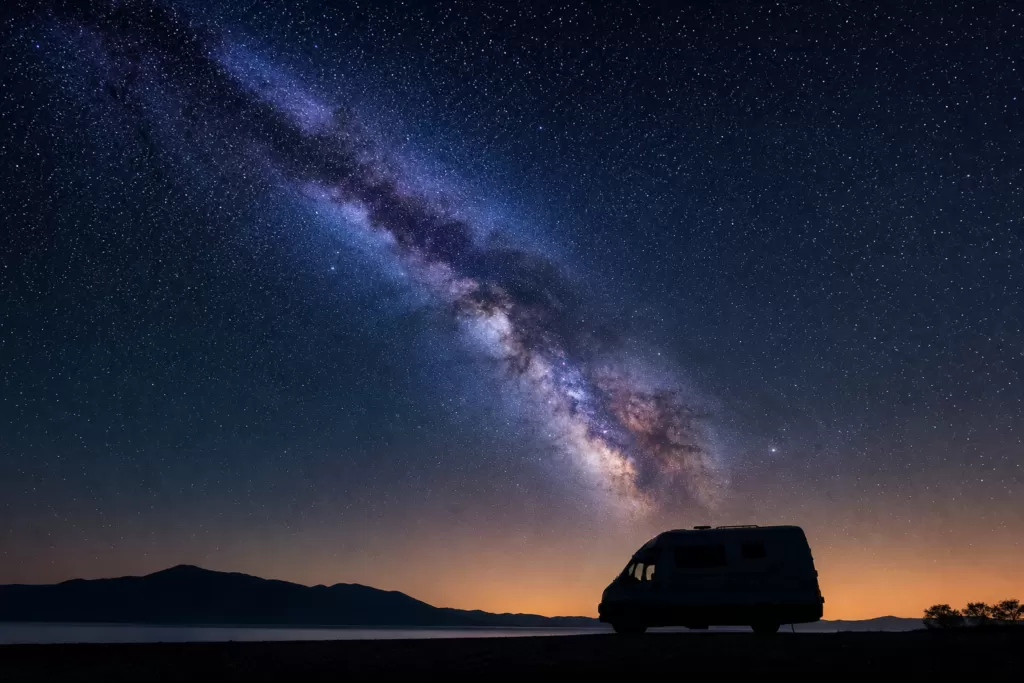
This is a guide to shooting the night sky from a campervan base in Hokkaido, where light pollution is minimal. It covers the Milky Way season, dark-sky spots like Nayoro and Rikubetsu, camera settings and cold-weather prep, how to use onboard power, and the logistics of shoot day.
Why Hokkaido Is Ideal for Astrophotography, and the Campervan Advantage
The biggest reason Hokkaido suits astrophotography is its low population density and vast farmland and wilderness. Even in regional cities on Honshu, the glow from surrounding houses and factories tints the sky, but in Hokkaido’s interior and in the northern and eastern regions, settlements are sparse and dark skies stretch almost to the horizon. Light-pollution maps show that Rikubetsu, Nakagawa, and parts of the Sarobetsu wetlands rank among the darkest areas in all of Japan. On the Bortle scale, which measures light pollution numerically, these areas fall into Class 2–3 (“rural sky”) — dark enough that the naked eye can pick out not just the outline of the Milky Way but faint nebulae and star clusters as well.
Summer clear-sky ratios also work in photographers’ favor. Hokkaido’s interior has no rainy season in July–August, and aside from Pacific-side fog, clear days are common. Even though annual sunny-day counts look similar to Honshu’s Japan Sea and Pacific coasts, Hokkaido tends to have a longer concentrated stretch of good weather in summer. That’s why field workers and photographers say “Hokkaido’s summer sky is the real deal” — the conditions here make it hard to miss a shooting opportunity.
Add a campervan to the mix and you get both mobility and comfort. Check the forecast and the moon’s phase, decide “tonight, that spot,” and simply drive there and stay overnight on-site. If the weather turns, just postpone a day and change your route. With no hotel bookings to change or luggage to repack, a campervan pairs perfectly with a “leave it to nature” hobby like astrophotography. Scouting a shooting location is easy too — just pull over along the way and take a look.
Onboard power lets you charge camera gear from the battery or a portable power station. Even in the cold of night, you can wait comfortably in a sleeping bag with the cabin heater running and step outside only when the timing is right — a shooting style only a campervan makes possible. A shooting schedule that would be physically brutal in a tent or bivouac becomes sustainable with a comfortable “mobile base.” Conserving energy while holding out until late at night makes a real difference on long shoots.
Milky Way and Meteor Shower Season Calendar, and How to Read the Moon’s Phase
The galactic core (in the direction of Sagittarius) climbs high in the southern sky from mid-July through mid-August, between late night and early morning. At Hokkaido’s latitude (roughly 43–45°N), the core doesn’t rise very high, but you can still see it arc clearly across the southern sky around 1–4 a.m. Because Hokkaido has no rainy season, clear skies often continue from early July, so — without needing to wait for the rainy season to end — the shooting season starts one to two weeks earlier here than for photographers on Honshu. In spring (April–May), the Milky Way starts rising from the eastern sky past midnight, making it a season for early-rising shoots. By autumn (September), the Milky Way tilts toward the west soon after sunset, leaving less shooting time than in summer. If you’re aiming for it, July–August is peak season.
The moon’s phase directly determines whether a shoot succeeds. Around the full moon, moonlight is strong and the Milky Way is nearly invisible. Aim for within three days of the new moon, or at least for the hours after moonset. Check moonrise and moonset times and the moon’s age in advance using an app like StarWalk or SkySafari. At a moon age of 25 or older you can expect dark skies before midnight, and even at a moon age of 5–8 you can target the hours after moonset. If moonset is at 1 a.m., a realistic plan is to concentrate shooting in the two to three hours after 1 a.m. Checking the Milky Way’s position and orientation the day before with the same app makes framing your composition on site much smoother.
The main meteor showers and their peak periods are as follows.
- Perseids: Peak Aug 12–13. The radiant sits high in Hokkaido’s sky, and under good conditions you can see dozens per hour.
- Geminids: Peak Dec 13–14. Bitterly cold, but many years see little interference from moonlight, and meteor counts rank among the year’s highest.
- Leonids: Peak Nov 17–18. Activity varies by year and can spike unpredictably.
- Eta Aquariids: Peak around May 6. Hokkaido still has patches of snow in spring, so cold-weather gear is essential.
For meteor photography, rather than a single long exposure with a wide-angle lens, the mainstream approach is interval shooting — stacking frames at ISO 1600–3200 with a 20–30 second shutter speed. You then use lighten-blend stacking software (such as Sequator) afterward to make the meteors stand out.
Dark-Sky Shooting Spots with Minimal Light Pollution (Rikubetsu, Nayoro, Sarobetsu & More)
Here are Hokkaido’s leading spots known for astrophotography. Temperatures drop at night at all of them, so cold-weather clothing is essential even in summer.
Rikubetsu Town (Tokachi Region)
Known as “Japan’s coldest town,” Rikubetsu is a small inland town where winter lows can drop below –30°C. Population is sparse and there’s almost no ambient light around it. The town actively promotes itself as a “star town,” and the Ginga-no-Mori Observatory (Galaxy Forest Observatory) is open to the public. Its 115cm reflecting telescope is one of the largest of its kind in Japan, and you can observe Jupiter and Saturn with your own eyes while staff explain what you’re seeing (advance reservation recommended). It’s also worth asking the observatory staff during the day about good shooting spots for that night.
If you’re traveling by campervan, the Michi-no-Eki (roadside rest stop) “Aurora Town 93 Rikubetsu” makes a good base. The typical style at night is to set up a tripod along farm roads near the observatory. That said, avoid entering farmland without permission, and use parking spaces beside the road instead. It’s about a 1.5-hour drive from Obihiro and about an hour from Abashiri. The location fits easily into an eastern Hokkaido driving route and can be worked into an itinerary alongside Shiretoko and Akan.
Nayoro City (Northern Hokkaido)
Nayoro City is home to the Nayoro Municipal Kitasubaru Observatory and puts serious effort into astronomy. Light pollution drops sharply just a short distance from the town center, and you’ll find spots where the Milky Way is clearly visible to the naked eye. Nayoro Onsen’s “Sun Pillar Park” has an adjoining campsite, letting you combine night shooting with a hot spring. Being in northern Hokkaido means a longer drive, but it’s about 1.5 hours by car from Asahikawa.
Sarobetsu Wetlands & Toyotomi Town (Northern Hokkaido)
Sarobetsu is Japan’s northernmost wetland, with almost nothing blocking the view, which opens up nearly to the horizon. Looking north you can see the ridgelines of Rishiri and Rebun islands, making it a good spot for northern-sky star landscapes. In some years, low-latitude auroras have even been observed from the main island of Hokkaido in autumn. Nearby Toyotomi Onsen is famous for its sulfur springs, ideal for soothing tired muscles the day after a shoot. Because it’s wetland, summer nights bring plenty of insects, so bug spray and long sleeves/pants are essential. A campervan you can retreat into keeps things comfortable even on buggy nights.
Nakagawa Town & Otoineppu Village (Interior Northern Hokkaido)
Nakagawa Town and Otoineppu Village along the Teshio River are extremely small settlements with populations in the low hundreds. At night, artificial light nearly disappears, and the Milky Way appears to pierce straight through the zenith. The Michi-no-Eki “Nakagawa” can serve as a base for overnight parking.
Niseko & the Foot of Mt. Niseko Annupuri (Southwestern Hokkaido)
Access from New Chitose Airport is relatively good, making this a good choice for first-time campervan travelers in Hokkaido. You can aim for star landscapes silhouetting Mt. Yotei and the Niseko mountain range. Winter, which overlaps with ski season, brings more light from resort facilities, but summers are quiet.
Compare Hokkaido Campervan Rentals
Base yourself at New Chitose Airport and compare rates, vehicle types, and pickup locations all in one place.
Compare rental companies and rates →Camera Settings, Gear, and Making Use of Onboard Power
Basic Camera Settings
Use the following as a starting point for star-landscape settings. You’ll need to adjust based on your gear and conditions.
- ISO: 3200–6400. Full-frame cameras, with their larger sensors, can keep noise manageable even at 6400. Treat 3200 as the practical ceiling for Micro Four Thirds.
- Aperture: A fast lens around f/2.8 is essential. At f/4 or slower you’ll need longer exposures, which makes stars more likely to trail.
- Shutter speed: 15–25 seconds. The longer your focal length, the shorter the time before stars start trailing. Use the “500 Rule” (500 ÷ focal length = maximum seconds) or the NPF rule as a guideline.
- White balance: Manual setting around 4000–4500K. Auto white balance is unstable at night.
- Focus: Use Live View and manual focus on a bright star. The infinity mark varies by camera model, so always check it yourself.
Recommended Gear
A 14–24mm f/2.8-class ultra-wide lens is the standard choice. Relatively affordable fast lenses are becoming more common too, such as the SIGMA 14mm F1.8 DG HSM or SAMYANG 14mm F2.8. For tripods, sturdy metal legs with solid weight are more stable and help resist night dew. A star tracker enables tracked exposures, letting you shoot much longer at the same ISO and aperture. Lightweight entry-level trackers (such as the SWAT-350 or Vixen Polarie) are compact enough that they won’t eat into your campervan’s cargo capacity.
Using Onboard Power
Campervans come equipped with a sub-battery or portable power station that you can use to charge shooting gear. The main uses are as follows.
- Charging spare camera batteries (a USB-PD charger plus a portable power station lets you charge several at once)
- Powering the star tracker’s controller (switching to AC-adapter power instead of AA batteries makes it more stable)
- Charging a laptop or tablet (for checking interval-shooting settings or using star-map apps)
- Running an electric blanket or seat heater (to keep you comfortable during late-night waiting)
If your vehicle has an inverter (AC conversion), you can run 100V appliances directly. However, high-draw devices deplete the sub-battery quickly, so manage heater and electric-blanket use in balance with how much charge you’re getting while driving. If the engine won’t start the next morning, it can ruin the whole trip. Bringing along a separate high-capacity portable power station (1000Wh or more) is another option. Well-known commercial brands (EcoFlow, Jackery, BLUETTI, etc.) in the 1000Wh class can charge a camera battery more than 50 times. If your shooting trip runs three nights or longer, it’s worth considering bringing one.
New Chitose Airport / Tokachi-Obihiro Airport
Rent the Cabcon “Cresson Journey”
Base yourself at New Chitose Airport and travel all across Hokkaido by campervan.
See details at Moving Inn →Shoot-Day Logistics, Cold-Weather Prep & Safety (Brown Bears / Nighttime)
Same-Day Logistics
Here’s what you should take care of during the daytime on your shoot day.
- Check weather and cloud cover: Use cloud-cover forecasts from Weather.com or Windy to check for clear breaks at night. SCW (supercomputer weather) is also good for reading Hokkaido’s localized cloud movement.
- Check moonrise/moonset times: Confirm the moon’s age and moonset time via StarWalk or the National Astronomical Observatory of Japan’s website. Use this to decide when to start shooting.
- Scout the shooting location: Check your parking spot and tripod position during daylight. At night, it’s hard to see the terrain without a headlamp, and there’s a risk of stepping off the edge of a paddy field or into an irrigation channel.
- Check battery levels: Fully charge your camera batteries and portable power station beforehand.
- Prepare bug and cold-weather gear: Even in summer, nighttime temperatures can drop to around 10°C. Keep a fleece or lightweight down jacket within easy reach.
Nighttime Brown Bear Risk
When shooting in Hokkaido’s farming areas or foothills, you need to take the presence of brown bears seriously. They’re often active from late night through early morning, and there’s no shortage of sightings near farmland and riversides.
Keep solo activity outside the vehicle to a minimum. Once your tripod is set up, stay as close to the vehicle as possible, and travel to and from the shooting spot in a group as a rule. A bear bell is essential — keep it making noise the whole time you’re moving. Choose a bright headlamp and periodically sweep the surroundings with it to check for anything nearby. Food odors attract bears, so never leave food outside the vehicle. Being able to store food inside a campervan is also a real safety advantage.
Carrying bear spray adds extra peace of mind. Check how to use it beforehand and keep it fastened somewhere you can grab it instantly.
Cold-Weather Prep and Managing Your Condition
Even in Hokkaido’s summer, temperatures drop sharply from late night into early morning. In Rikubetsu and Nakagawa, some July nights see lows below 10°C. Waiting in the same position for a long shoot chills your body quickly, so keep an electric blanket or heat packs in the vehicle and warm up periodically. Hypothermia is hard to notice, and by the time symptoms appear it’s already too late, so set a rule: the moment you feel cold, head straight back into the vehicle.
Preserving your eyes’ dark adaptation matters, so lower your smartphone’s brightness or use a “red light mode” when checking the screen. Once you look at white light, you lose your dark adaptation, and it takes 15–30 minutes before you can see the stars clearly again.
Frequently Asked Questions (FAQ)
Q: Can I shoot the Milky Way with a smartphone camera?
Recent smartphones come with “night mode” or “astrophotography mode,” and a growing number of models can capture the Milky Way, albeit more coarsely than a dedicated camera. That said, it assumes a dark, light-pollution-free sky and a tripod-mounted phone — handheld shots will blur. If you have a Google Pixel 8 or later, or an iPhone 15 Pro-class device, it’s worth trying on a good night.
Q: Is there a particular type of campervan best suited to astrophotography?
It’s not limited to any one vehicle type, but a cab-conversion (cabcon) model with generous cargo capacity and well-equipped onboard power is convenient, since it can carry a lot of gear. Star trackers, tripods, cold-weather clothing, and spare batteries are all bulky, so a vehicle with roomy cargo space makes things more comfortable. If you’re renting, check at booking time whether it has a portable power station and an inverter.
Q: Can I reach a stargazing spot on a day trip from New Chitose Airport?
Rikubetsu and Nayoro are each three to four hours or more one-way from New Chitose Airport. Since shooting happens late at night through early morning, you effectively need at least one overnight stay. Niseko and Tomamu, on the other hand, are within one to two hours by car and are relatively easy to reach. Being able to stay overnight on-site in a campervan lets you combine travel and shooting without wasted time.
Q: What are the tips for processing star-sky photos beautifully?
Shooting in RAW format is the prerequisite. Lightroom (Adobe) and Luminar Neo (Skylum) both work well for star-landscape processing. The three key points are: don’t apply too much noise reduction (it will erase the stars), carefully bring out the Milky Way’s color with careful color calibration, and correct the ground and sky separately. If you’re stacking multiple frames, Sequator (free, Windows) and StarryLandscapeStacker (Mac) are the standard tools.
Q: Can you see the aurora in Hokkaido?
You can’t normally see the aurora (the high-latitude aurora) in Hokkaido. However, during periods of extremely high solar activity — 2024–2025 marked a solar maximum — low-latitude auroras have been confirmed even in Hokkaido. Forecasts suggest solar activity will remain elevated into 2026 and beyond, so if you check space-weather forecasts (NICT, SpaceWeather.com) before heading out, you may get lucky and catch a glimpse of the aurora.
Book a Campervan in Hokkaido
Moving Inn New Chitose Airport supports English booking and offers airport transfers.
![When and Where Can You See Harbor Seals at Cape Erimo? Kaze no Yakata Official Information, Viewing Season, and Windy-Day Notes [2026-27]](https://hokkaido-campingcar.jp/wp-content/uploads/2026/10/erimo-cape-lighthouse-768x511.jpg.webp)
![Where and Under What Conditions Can You See Diamond Dust in Hokkaido? How Cold a Morning It Takes, and Where It Appears [2026-27]](https://hokkaido-campingcar.jp/wp-content/uploads/2026/10/hokkaido-diamond-dust-nayoro-768x512.jpg.webp)
![Can You Drive to Hokkaido Jingu for Hatsumode? Parking, Crowds, and Where to Park and Walk [2027]](https://hokkaido-campingcar.jp/wp-content/uploads/2026/10/hokkaido-jingu-winter-torii-768x504.jpg.webp)
![Hokkaido Roads Over New Year [2026-27] | Expressway Sections Prone to Blizzard Closures, Forecast Congestion Days, No Holiday Discount, and New Chitose Airport Parking](https://hokkaido-campingcar.jp/wp-content/uploads/2026/10/hokkaido-winter-rural-road-edge-markers-768x432.jpg.webp)
![Where to See Sea Smoke (Kearashi) in Hokkaido: Rumoi’s Ogon-misaki and the Morning Conditions [2026-27]](https://hokkaido-campingcar.jp/wp-content/uploads/2026/10/rumoi-kearashi-sea-smoke-768x511.jpg.webp)
![Geminid Meteor Shower 2026 in Hokkaido: Peak Around 23:00 on December 14, Sapporo Moonset 20:40, and Staying Warm in a Winter Campervan [2026]](https://hokkaido-campingcar.jp/wp-content/uploads/2026/10/geminids-2026-hokkaido-768x575.jpg.webp)